 |
|
|
|
|
|
|
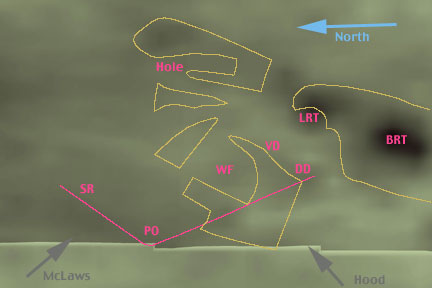
The above map closes in on just the south end of the field. Sickles was assigned to defend the Hole and Little Round Top. Instead, he moved forward to defend the red line shown. The positions shown with initials are Little Round Top (LRT), Big Round Top (BRT), Devil's Den (DD), the Wheatfield (WF), and the Peach Orchard (PO).
VD stands for the Valley of Death. The valley itself is Plum Run Valley, which is the low area separating VD and DD from LRT. My label "VD" is positioned where I took the Valley of Death photographs of Little Round Top, not from the center of the valley itself.
The gold lines indicate forests, as they were in 1863. The wooded areas have expanded considerably since. The "swath of grass" in south of the hole existed then, but has since extended considerably to the north. The forest on top of cemetery ridge, and the opposite forest have both been allowed to grow.
The pink line from DD to PO to SR is clean, smooth and artificial. It is not wrong. The line runs through several strong points at which many units were assigned and much fighting took place. The battle was not so neat and clean.
 |
|
|
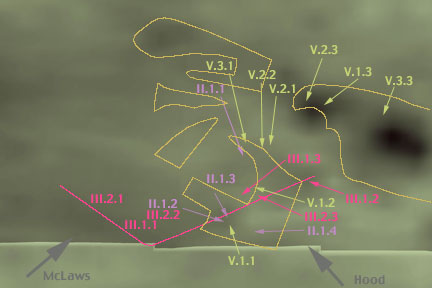
While McLaws' and Hood's Confederate divisions are shown coming in from the bottom of the above picture, the prime intent is to show the positions of the memorials dedicated to Union brigades. The notation used is Corps.Division.Brigade. For example V.1.3, is V Corps, 1st Division, 3rd Brigade. This is Colonel Vincent's brigade, on top of Little Round Top. II Corps is in violet, III corps hot pink, and V Corps in yellow. The forests are again outlined in gold. The attacking confederates are shown in gray.
There is a hazard in showing positions of memorial markers, rather than going to other sources. V.1.3, for example, was pretty much on its own during the critical attacks on Little Round Top. V.2.3 and V.3.3 were allowed to place markers at their reinforcement positions, but there was no significant fighting on Big Round Top or by V.3.3.
Still, a few points can be made from this map. The bulk of the fighting for the Wheatfield was done not in the Wheatfield, but around it. There are no brigade markers in the field itself, save II.1.1 to the north. However, there are three clumps of 3 or 4 brigades each just west, south and north of the field. My picture of the Wheatfield shows a very gentle ridge, barely worth fighting for. Apparently, they didn't really fight for it. An attacker would not cross an open space when several brigades of enemy infantry are on either side of that open space. An attacker would far prefer to stay in the cover of trees. The woods on the edges of the field had to be cleared before the field itself would be occupied. For the same reason, the most serious threat to Little Round Top was the flanking attack through the woods.
The other point is that this was be a bad day to be a Union division commander in II, III, or V corps. There is an oft told story of how General Warren and Colonel Vincent saved Little Round Top. General Warren recognized the threat. According to proper line of command and army protocol, he should have then given orders to General Sykes of the V Corps. Sykes should then have given orders to General Barnes of V Corps, 1st Division. General Barnes would then give orders to Colonel Vincent of V Corps, 1st Division, 3rd Brigade. By the time proper protocol had been followed, it would have been too late. Colonel Vincent offered to bypass established protocol, and simply asked General Warren where he ought to be. Strictly speaking, this was most improper, but the situation was beyond handling by the book.
The three brigades on the Round Tops are from three different divisions. The three division commanding generals of the V Corps had responsibilities on both sides of the Valley of Death. Colonel Vincent was thus not likely to have been the only officer to shortcut chain of command on July 2nd. While it seems none of the II or V Corps reinforcements got as far as the Peach Orchard, the fighting around the edges of the Wheatfield was a confusion of crossed commands.
The base reason is that General Sickles did not defend his assigned zone. He instead moved forward to defend a much longer line. When attacked by a superior force, even with the advantage of terrain, he could not hold. The Union had no choice but to throw the next available unit where it was needed most.
Next : The Photo Tour Begins. The right flank of Sickle's Hole.