 |
|
|
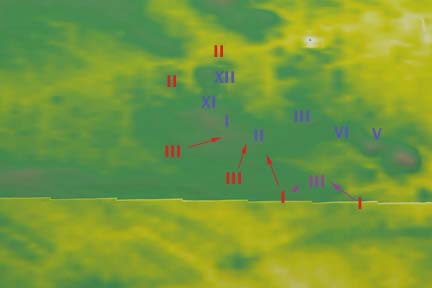
The above diagram shows Confederates in red, the Union in blue. Each Confederate red numeral represent half a Confederate corps. Each blue numeral represents a full Union corps. As the Union had slightly more men on the field, and was organized in seven corps to the Confederate's three, each numeral represents a unit of roughly similar strength.
The map represents the July 3 positions before Picketts Charge. It is distinctly simplified. Patching up Sickles' line on July 2 required sending whatever unit was available where it was immediately needed. As a result, the Union corps were very much intermixed with one another. For example, while the VI corps is shown as covering Sickles' Hole, only one of the VI corps divisions was on the left flank. The other divisions were with the XII corps, covering the right flank of Culp's Hill.
There is a purple III located at the Peach Orchard. This is Sickles' III corps position on July 2. Again, the blue positions are July 3.
The attacker is should seek to get two or more red roman numerals adjacent to one of the blue numerals. For the attack to succeed, one wants to have more attackers than defenders at the point of attack.
One can see clearly the advantage of the interior lines of Meade's fish hook. At the start off positions, the Union troops are packed closer together. If one unit needs help, the next unit is close by. As each unit has less area to defend, there are more men in any given length of line. A unit in reserve in the middle rear of the fish hook, where the Blue III corps is shown above in it's July 3 position, can reach anywhere on the line that is threatened very quickly. In addition, along most points of the line, the union has high ground.
Clearly, the place to attack if the opportunity is given is the purple III. The Peach Orchard is a "salient." Troops can hit it from more than one direction. While Longstreet's I corps started from further back on July 2, he was able to bring his full I Crop onto the single Union III Corp. It took a good size chunk of two other Union corps and a retreat to the fishhook line to recover the situation.
On July 3, the alternate solution was Pickett's Charge.
Another major factor in selecting attack positions is fatigue. Fresh troops can hit harder than expended troops. Throwing fatigued troops against a position they failed to take in previous attempts is unwise. The night before Pickett's Charge, Meade predicted that if Lee attacked, it would be against the Union center. This was exactly what happened. How did Meade guess? On the previous days, there was heavy fighting focused on both Union flanks. The Confederate flanking troops were exhausted, had taken casualties, and were low on ammunition. The fresh Confederate troops were in the Confederate center, late arriving reserves from the I and III corps. They were chosen to lead Pickett's Charge. They were sent straight forward rather than trying to move them to a flank, while pulling back flanking troops to cover the center.
Lee would commonly divide his army. This risks defeat in detail but gives freedom of maneuver. This time he didn't do it. He could have circled the center troops around a flank leaving a gap in the center, but he already had exterior lines and exhausted troops. The center also guarded Lee's supply road through a gap in South Mountain. This would have been too great a risk.
Fatigue also likely played a role in Meade's decisions not to press counter attacks on July 3 and 4. The Union I and XI corps had been badly mauled on July 1. The XI and XII corps saw fighting around Culp's Hill on July 2nd and early on July 3rd. The Union II, III, and V corps had barely stopped Longstreet's I corp on July 2nd. These three corps were also somewhat intermixed, as reinforcing units of the II and V corps had been thrown into holes in the III corps line on an emergency basis. Meade's only fresh unit was the VI corp, which was also divided, defending both the left and right flanks.
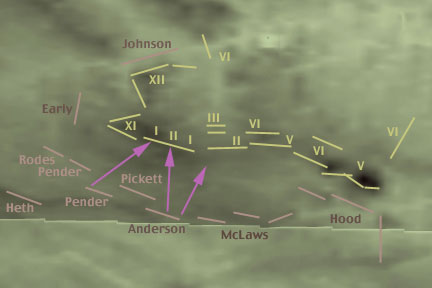
There is a step beyond 'fatigued.' At the Gettysburg Park, they sell maps showing the positions of the various units on each of the three days. Heth's division simply isn't shown on the Day 2 map. While a few of Heth's troops supported Pickett's Charge, for the most part the heavy fighting on July 1st rendered Heth's division incapable of further action.
While this site is focused towards the III Corps line and Picket's Charge, this is not because there wasn't serious fighting on July 1st.
General Birney, who had taken over the Union III Corps after Sickles was wounded, judged the III Corps "used up." The fighting on July 2nd left it not ready for further action. Like Heth's division, the III Corps was pulled out of the fighting line, placed in the center rear as an emergency reserve.
 |
|
Note Heth's Division and the Union III Corps in reserve |