 |
 |
|
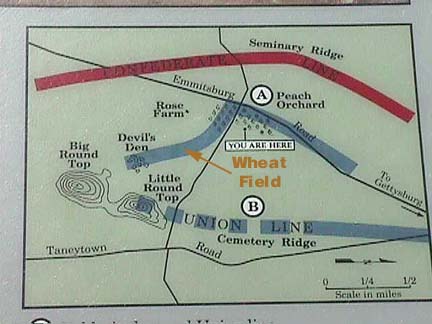
From a Park guide sign at the Peach Orchard |
|
|
|
|
|
From a Park guide sign at the Peach Orchard |
The
Battle of Gettysburg is haunted by "what ifs." What if Stonewall had
lived, and commanded the Confederate left on the first day? What if
Stewart had stuck close to Lee with the South's best cavalry,
screening and scouting instead of raiding the Union rear? While I
have opinions on these and other unanswerable questions, many a full
length text book has been written to explore them. I've chosen to
focus on a question best explored with web pages and pictures, rather
than textbooks...
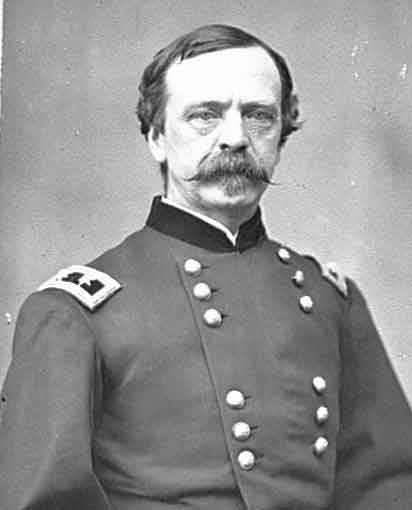
Why did General Sickles move his Third Corps forward without orders? Sickles claimed this was the proper tactical maneuver. The position favored by Meade was "in a hole." At Chancellorsville, a few months earlier, he had been ordered to give up a dominating height, to retreat to low ground. The Confederates then occupied the height, and bombarded Sickles' Corps. Thus, at Gettysburg, he was not content sitting in a hole.
|
"I took up that position, which is described in the report of General Halleck as a line from half to three-quarters of a mile in advance, as he says, and which, in his report, he very pointedly disapproves of, and which he further says I took up through a misinterpretation of orders. It was not through any misinterpretation of orders. It was either a good line or a bad one, and, whichever it was, I took it on my own responsibility, except so far as I have already stated, that it was approved of in general terms by General Hunt, of General Meade's staff, who accompanied me in the examination of it. I took up that line because it enabled me to hold commanding ground, which, if the enemy had been allowed to take -- as they would have taken it if I had not occupied it in force -- would have rendered our position on the left untenable; and, in my judgment, would have turned the fortunes of the day hopelessly against us. I think that any general who would look at the topography of the country there would naturally come to the same conclusion." |
|
|
|
cwp 4a40320 |
In moving forward, did he save the Union? Did he force Meade to fight at Gettysburg, rather than Meade's supposed intent to retreat to the Pipe Creek defensive line? Did he move forward from a weak position suggested by Meade, to a much stronger position? In defending his advance, Sickles made all these claims and more. Alternately, did he nearly blow everything by overextending his line, giving up strong positions for weak ones, stretching his men over a line three times as long as his original position, and leaving both his flanks dangling in thin air?
The short answer is D. Sickles nearly blew the battle by moving forward to an untenable position without support or orders. And yet, the above Park Service sign doesn't quite do Sickles justice. While to the right, the Union Line was indeed anchored on Cemetery Ridge, the above "Cemetery Ridge" label isn't entirely accurate. It might better read "Plum Run Valley." General Sickles' original position was indeed in a hole.
The focus of these pages was originally on the pictures of the field and General Sickles' Third Corps. The site keeps growing. Every time Sickles' Hole feels complete, just one more thing seems required. First, no single picture gives a perspective of the entire battlefield, so the cyber maps were added. To explain who had the numbers advantage on a given day and why, Lee's strategy, Meade's response and the resulting marches are described. While the focus was initially on the Sickles controversy, Longstreet's reluctance to fight at Gettysburg is equally controversial, as is Meade's 'timid' follow up of his victory. As many find Sickles' Hole based on searches for Civil War or Gettysburg photos or maps, special emphasis was added in these areas. There is a very basic primer on Civil War tactics and military organization. I am adding more detailed accounts of a few of the better known actions, including the fighting at The Angle, and the 20th Maine's fight on Vincent's Spur. Finally, a few words were added on the Dead and Cemetery pages that hopefully address more than the cold tale of tactics, terrain and maneuver.
The result is hopefully a decent introduction to the battle as an historical event. It is hardly the final word. The controversies are such that there will likely never be a final word. For further exploration, links are provided below. Recommended books may be found on the Technical page.
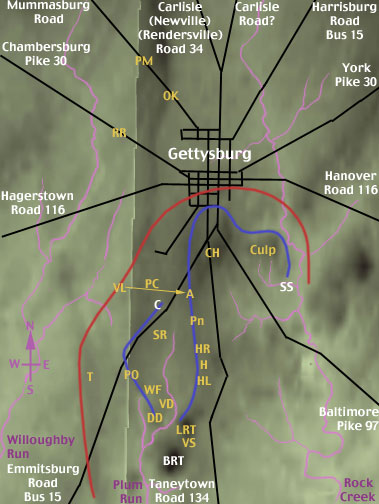
The following map is rotated as compared to the Park Service map, to the traditional north at the top of the map. In blue, the well known "fishhook" shape of the Union line is shown. The eye of the hook begins at Little Round Top (LRT). The "shank" flows through Plum Run Valley (HL, H, HR), to Cemetery Ridge (A) and Cemetery Hill (CH). The hook then curves east to Culp's Hill (CH) and Spangler's Spring (SS).
 |
|
Click on the yellow letters for picture pages. Background is a terrain map, black showing high ground (hills), white low ground (streams), green middle. For more on the terrain, visit the View from Cyberspace. (The road labels include modern route numbers.) |
|
A |
|
|
BRT |
Big Round Top |
|
C |
Codori Barn |
|
CH |
|
|
Culp |
|
|
DD |
|
|
H |
Sickles' Hole (Where he should have been.) |
|
HL |
|
|
HR |
|
|
LRT |
|
|
OK |
Oak Ridge (July 1, Union XI Corps) |
|
PC |
Pickett's Charge (Longstreet's 2nd Assault?) |
|
PM |
The Peace Memorial. (July 1, Union I Corps) |
|
Pn |
Pennsylvania Monument (Obvious Landmark) |
|
PO |
|
|
RR |
|
|
SR |
|
|
T |
Tower, War Department's Southern Observation |
|
VD |
Valley of Death (West Edge) |
|
VL |
|
|
VS |
Vincent's Spur - The 20th Main on Little Round Top |
|
WF |
Confederate General Longstreet's Day 2 jump off position, the south portion of the red confederate line, including T but not so far as VL also has a hook shape. This is in part an attempt to reach around the Union left flank, but it also reflects the tree line of the major field at Gettysburg. The red positions to the south are as close as Longstreet could get to the Union Army without exposing his position to watchers on Little Round Top and elsewhere.
Near the town of Gettysburg, another Confederate hook shaped line is attempting to reach around the Union right flank. Lee and the Confederates had made a living the first several years of the war, attacking Union flanks. It worked well at Chancellorsville, and elsewhere. In this case, Lee's smaller army in striking both flanks was attempting to surround the slightly more numerous Union army. General Meade had seen flanking movements often enough to secure both flanks on strong positions, Culp's Hill and Little Round Top. The fish hook also gave the Union the advantage of "interior lines." They could move troops from side to side to patch a threat much quicker than the Rebels could.
This web site can be navigated several ways. The above map and table of contents will take you to many points on the battle field. Alternately, the photo pages are linked in clockwise order, starting from where Sickles should have been (HR, H, HL, LRT, VS), touring through where he ended up (DD, VD, WF, PO, SR), then finishing with July 3rd's major action, Pickett's Charge (VL, PC, A). In addition, the page describing the July 1st opening battle has a few photos of northern fields (PM, OK, RR). The navigation bar at left also reflects the clockwise tour of the field. The shorter table of contents below covers the non-photo page categories.
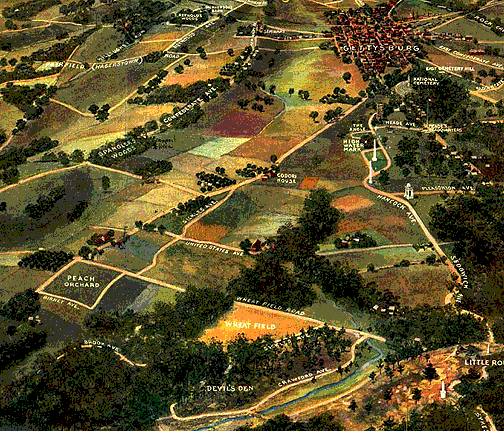 |
The 1913 Pennsylvania Railroad map of the Gettysburg
Battlefield
The view is from the south looking north. Click on map to reach
picture pages.
Those interested in U.S. and military history might wish to visit some of my other sites.